Scenario 3 - Granting an EC2 Instance access to DynamoDB Table and perform CRUD Operations
Scenario:
Creating an IAM policy that grants access to an Amazon DynamoDB table for an Amazon Elastic Compute Cloud (EC2) and also performs CRUD operations using AWS-CLI.
Solution:
You can use an IAM role to grant the EC2 instance the necessary permissions to access the DynamoDB table.
To set this up, you would create an IAM role with permissions to access the Amazon DynamoDB table and then attach the role to the Amazon Elastic Compute Cloud (EC2). The EC2 instance can then use the role's temporary security credentials to the DynamoDB table.

First of all, please make sure that the AWS CLI configuration is done successfully.

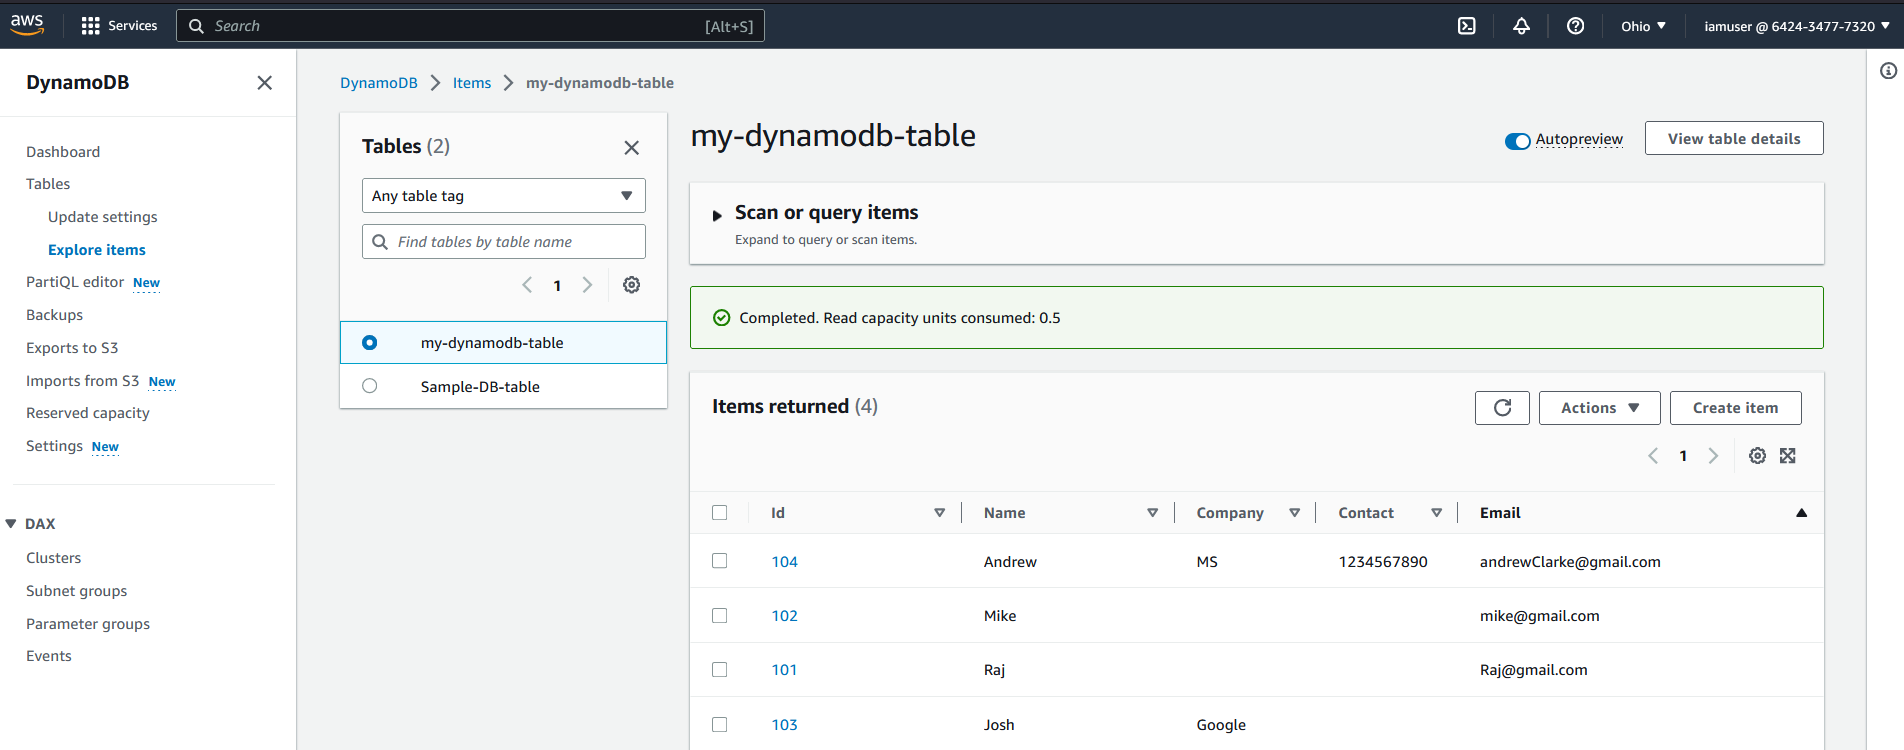
Below is the DynamoDB table with some items already created on which we are going to perform CRUD operations. Create an Item to a table using the console or AWS CLI.

Once the CLI is configured, you can create an IAM policy using the create-policy command. For example, to create a policy called dynamodb-access-policy.json with permission to publish messages to specific topic, you might use a command like this:
aws iam create-policy --policy-name DynamoDBAccessPolicy --policy-document file://dynamodb-access-policy.json
The dynamodb-access-policy.json file in this example would contain a JSON document describing the permissions that you want to grant to the role. You can find more information on creating policy documents at Policies and permissions in IAM
Here's an example policy document that would allow the policy to access a specific DynamoDB table called my-dynamodb-table. This policy allows the user to perform various operations on the specified DynamoDB table, including retrieving, adding, updating, and deleting items (CRUD) from the specific table.
{
    "Version": "2012-10-17",
    "Statement": [{
            "Effect": "Allow",
            "Action": [
                "dynamodb:GetItem",
                "dynamodb:PutItem",
                "dynamodb:UpdateItem",
                "dynamodb:DeleteItem"
            ],
            "Resource": "arn:aws:dynamodb:<region>:<account-id>:table/my-dynamodb-table"
    }]
}
This IAM policy allows the following actions:
GetItem: Allows the user to retrieve a single item from the specified DynamoDB table.
PutItem: Allows the user to add a new item to the specified DynamoDB table.
UpdateItem: Allows the user to update an existing item in the specified DynamoDB table.
DeleteItem: Allows the user to delete an item from the specified DynamoDB table.
The policy applies to the specified DynamoDB table (denoted by "arn:aws:dynamodb:<region>:<account-id>:table/my-dynamodb-table").


Create a policy which is a JSON file that defines the trust relationship of the IAM role like here we are creating ec2-assume-policy.json file which would contain a JSON document describing the permissions that you want to grant to the role.
Here's an example policy document that would allow the role to be assumed by EC2 instances:
{
    "Version": "2012-10-17",
    "Statement": [{
        "Effect": "Allow",
        "Principal": {
            "Service": "ec2.amazonaws.com"
        },
        "Action": "sts:AssumeRole"
    }]
}

Once the trust policy has been created, you can create an IAM role using the create-role command. you can create an IAM Role using the 'create-role' command from aws-cli-create-role-command-docs
aws iam create-role --role-name EC2RoleToAccessDynamoDBTable --assume-role-policy-document file://ec2-assume-policy.json

Once the role has been created, you can attach it to an EC2 Instance using the attach-role-policy command as seen below.
aws iam attach-role-policy --role-name EC2RoleToAccessDynamoDBTable --policy-arn "arn:aws:iam::642434777320:policy/DynamoDBAccessPolicy"


call the create-instance-profile command, followed by add-role-to-instance-profile command to create the IAM Instance profile EC2RoleToAccessSNSInstProfile
aws iam create-instance-profile --instance-profile-name EC2RoleToAccessDynamoDBTableInstProfile

aws iam add-role-to-instance-profile --role-name EC2RoleToAccessDynamoDBTable --instance-profile-name EC2RoleToAccessDynamoDBTableInstProfile


Finally, attach the IAM role to an existing EC2 instance that was originally launched without an IAM role using the associate-iam-instance-profile command to attach the instance profile EC2RoleToAccessSNSInstProfile for the newly created IAM Role, EC2RoleToAccessDynamoDBTable.
aws ec2 associate-iam-instance-profile --instance-id i-04c85291954fe6e5f --iam-instance-profile Name=EC2RoleToAccessDynamoDBTableInstProfile


After performing all these 6 steps, an EC2 instance will be associated using the recently created IAM Role, and now the EC2 instance will have the necessary permissions to access the DynamoDB table through the IAM role.
Let's now perform the CRUD operation on a specific table in DynamoDB.
- GetItem: This operation allows you to retrieve an item or multiple items from a DynamoDB table.
# Get Item (retrieving existing items from the table)

aws dynamodb get-item --table-name my-dynamodb-table --region us-east-2 --key '{"Id": {"N": "104"}, "Name": {"S": "Andrew"}}'


- PutItem: This operation allows you to add a new item to a DynamoDB table.
# Put-item [ Adding extra attributes into existing items into a table (Ex- adding Email attribute to Raj)]

aws dynamodb get-item --table-name my-dynamodb-table --region us-east-2 --key '{"Id": {"N": "101"}, "Name": {"S": "Raj"}}'

aws dynamodb put-item --table-name my-dynamodb-table --region us-east-2 --item '{"Id": {"N": "101"}, "Name": {"S": "Raj"}, "Email": {"S": "Raj@gmail.com"}}'


# put-item (adding new items into table)

aws dynamodb put-item --table-name my-dynamodb-table --region us-east-2 --item '{"Id": {"N": "105"}, "Name": {"S": "Joseph"}, "Email": {"S": "Joseph@gmail.com"}}'


- DeleteItem: This operation allows you to delete an item from a DynamoDB table.
# delete item from the table

aws dynamodb delete-item --table-name my-dynamodb-table --region us-east-2 --key '{"Id": {"N": "105"}, "Name": {"S": "Joseph"}}'


- UpdateItem: This operation allows you to modify an existing item in a DynamoDB table.
# update item on the table (here, we are updating Email attribute of existing item)

aws dynamodb update-item --table-name my-dynamodb-table --region us-east-2 --key '{"Id": {"N": "104"}, "Name": {"S": "Andrew"}}' --update-expression "SET #Y = :y" --expression-attribute-names '{"#Y":"Email"}' --expression-attribute-values '{":y":{"S": "andrewClarke@gmail.com"}}'


References:

